Mounting an encrypted hard disk (LUKS) using Kali Linux live USB
Problem Statement
My sister attempted to upgrade her laptop from Ubuntu 14.04 to 16.04. During the upgrade, there was a prompt that requested for a new encryption password setup. Of which she obliged and continued with the upgrade. All went well, until she rebooted the laptop. The grub menu loads up, then gets stuck on loading the kernel. Any Linux user knows that, if this happens, you either messed up badly of something went terribly wrong. In this case, unfortunately, the upgrade broke ☹.
The laptop was fully encrypted and contained tons of invaluable data both my sister’s and mine, which we both couldn't afford to lose. In terms of backup, the data was not fully backed up, i only had bits and pieces of my data that i really needed regularly, on an external hard drive. So basically, we both didn’t have a full or incremental data backup.
Now back to the problem. At this point, the laptop seems inaccessible with data that we both would like to gain access to. So, what now?? Let's see how i worked around this, to regain access to the encrypted hard drive and the data.
Disclaimer: Some of the images on the blog might not be as clear, please bear with me. My phone doesn't have the best of cameras.
Fact Finding
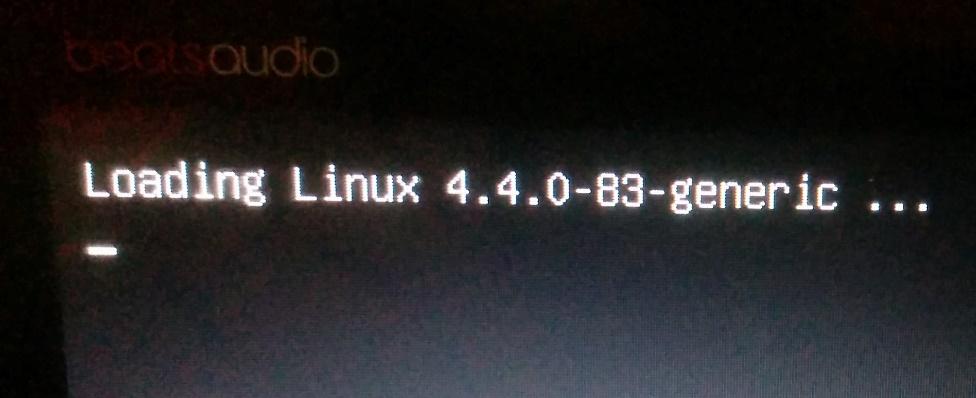
Now it was time to try and figure out how bad the situation really is. I boot up the machine and the grub menu loads up the grub menu. By default, the operating system will boot into the first option after a few seconds, if you don't select any of the other two options.

It then proceeds to this screen and gets stuck trying to load the kernel 4.4.0-83-generic, as mentioned earlier. The cursor stays there for a very long time, which shouldn't be the case.
At this point, I couldn't do much, so I reboot the laptop by pressing down the power button. This is the only way I could turn off the laptop. It usually feels like this.

This time, I decide to select Advanced options for Ubuntu to see what options are available.

These are the options available under that section.
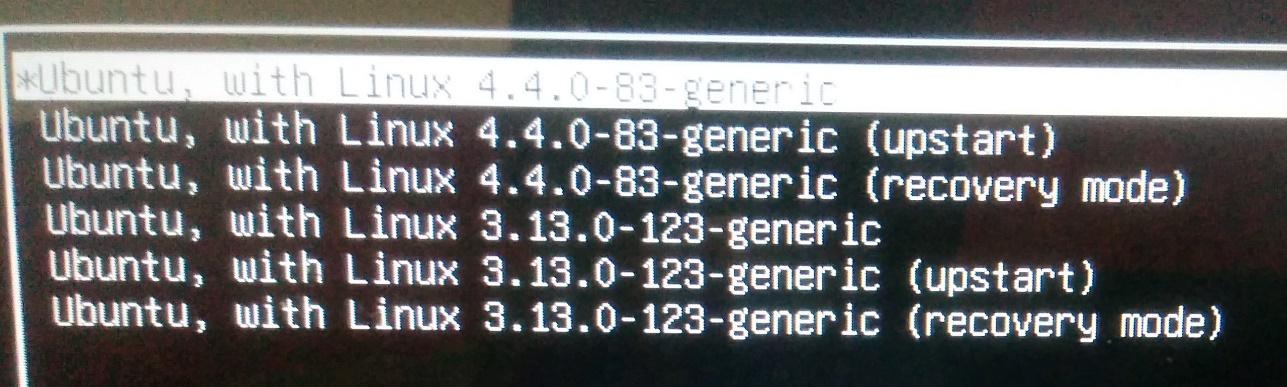
Now this is good news. There are two kernels available i.e. 4.4.0-83-generic and 3.13.0-123-generic. This is great, because I can select the other kernel and hope that Ubuntu can load into it and initiate the rest of the boot process.
I select Ubuntu, with Linux 3.13.0-123-generic and it successfully loads the kernel and boots up till the point it asks for the password to decrypt the hard drive.
I select Ubuntu, with Linux 3.13.0-123-generic and it successfully loads the kernel and boots up till the point it asks for the password to decrypt the hard drive.
Now this is where things get interesting. I enter the new password that my sister set up and it constantly failed. I honestly tried the password so many times, at one point I even thought maybe the keyboard local settings might have even changed. At one point, I was even trying the old password, just in case the upgrade had not altered it yet. Some wishful thinking but still no luck.
At this point, I figured, maybe I could try boot up using a Live USB running Linux, and try mount the hard drive again from the live USB. I decided to use Kali Linux as the distribution of choice. You can download Kali Linux here.
In order to make the flash disk bootable, I used unetbootin, which can be downloaded here. I prefer unetbootin as it's very reliable and someone rarely has any issues with the Linux OS refusing to boot up from the USB drive. I highly recommend using it to create Live USB drives.
To create a bootable Kali Linux USB drive, simply download the Kali Linux ISO file of your choice and unetbootin for your respective distribution from the links above. After downloading unetbootin, execute it and select the Disk Image option, the ISO you downloaded and confirm that you have selected the correct flash drive. Below is a screenshot of unetbootin on my setup, running on a windows laptop. Your mileage may vary on Linux and Mac. Click OK, sit back and let unetbootin do its thing. It should be done in a few minutes.

Before booting the Live USB, you will need to edit your BIOS options to boot from USB drive. On the HP Envy, hitting F10 as the laptop just boots up, gives you access to the menu below.

I hit F10 to get to get the BIOS setup screen, shown below. I played around with both the EUFI and legacy boot order.

After selecting the desired boot option and setting the USB drive as the first device in the boot order, you should be good to go, once you save the changes.
I had lots of trouble getting the laptop to boot from the USB in EUFI boot mode. It would not detect the USB drive, when selecting the device to boot from but it eventually worked when I re-enabled secure boot and disabled legacy boot. The legacy boot mode, worked just fine.
To get into the Boot Device menu, press F9 as the laptop boots up, after saving the changes above. You should see the several devices you can boot from, as shown below.

I selected the USB Hard drive option and the laptop successfully booted from the flash drive into the unetbootin menu screen below.

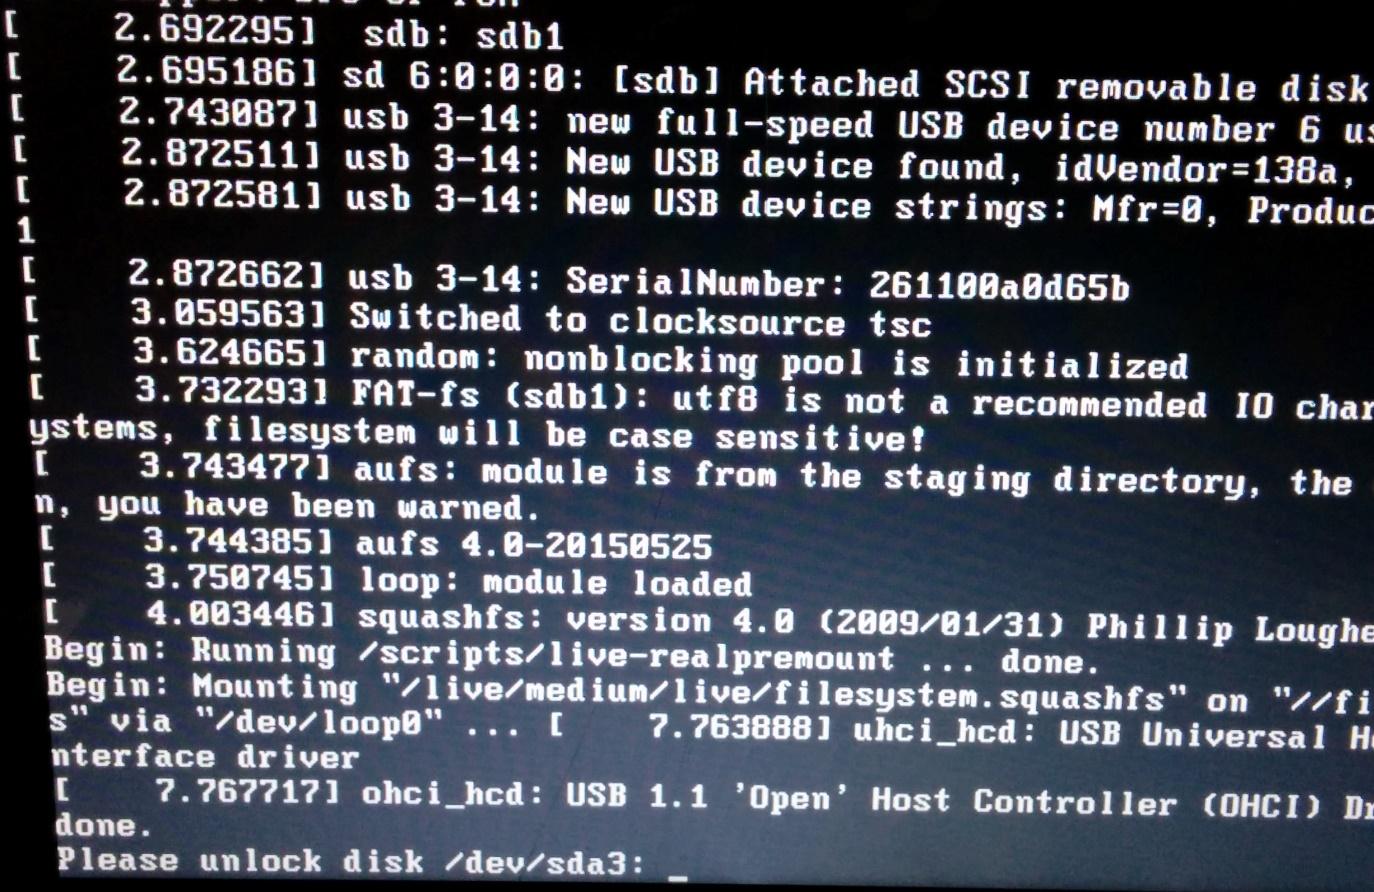
I selected the Live USB Encrypted Persistence option and it the kernel was successfully loaded from the USB drive and the boot initialization started.

At this point, I entered the original encryption and it accepted it, yaaaay! 😊 Then the kali desktop showed up soon after.

I opened the terminal to check if the hard drive and its partitions are recognised, using the fdisk command.

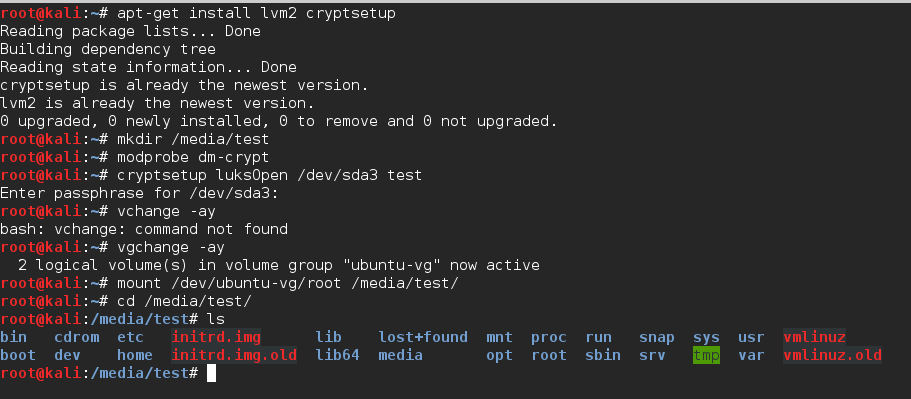
The partition of interest is /dev/sda3. I then mounted the encrypted drive, using the commands below.
- Install the necessary requisite tools
- apt-get install lvm2 cryptsetup
- Create directory to mount the drive to
- mkdir /media/test
- Load the dm-crypt kernel module
- modprobe dm-crypt
- Open the partition using cryptsetup and enter the encryption password
- cryptsetup luksOpen /dev/sda3 test
- Activate all volume groups available
- vgchange -ay
- Mount the partition to the directory created earlier
- mount /dev/ubuntu-vg/root /media/test
- Access the hard drive on the mounted location
- cd /media/test
Now I had full access to the encrypted hard drive partition 😊. I then backed up all the necessary data on my external hard drive and formatted the laptop with an up to date Linux distro, and copied the required data back to the laptop.
Lessons Learnt
- Always keep an updated backup of your data. This goes without say. It's basically the first unwritten rule of computing.
- Keep within reach a live USB flash drive running Linux. You can never know when it can come in handy
- Never forget your encryption password, EVER. If you ever do, it's basically GAME OVER.
- Don't be too quick to format your machine, there would just be a way to get access your data, that you haven't thought about.
References
- https://quonn.wordpress.com/2010/12/01/how-to-mount-lvm-partition-on-ubuntu/
- http://www.linuxwave.info/2007/11/mounting-lvm-disk-using-ubuntu-livecd.html?m=1
- https://digitalvectorz.wordpress.com/2011/06/09/mounting-an-encrypted-hard-disk-luks/
- https://ubuntuforums.org/showthread.php?t=868681


